|
PVCAM
3.9.x
Programmable Virtual Camera Access Method library
|
|
PVCAM
3.9.x
Programmable Virtual Camera Access Method library
|
During sequences, the exposure mode (also referred to as 'Trigger Mode') determines how and when each exposure begins and ends.
PVCAM supports several exposure modes:
The modes above are considered legacy modes and are mostly used for CCD cameras only. For sCMOS cameras, new extended modes were introduced:
Please refer to PL_EXPOSURE_MODES in PVCAM header for a complete list of exposure modes and always use the PARAM_EXPOSURE_MODE to discover the list of the camera-supported modes.
In general, the settings in pl_exp_setup_seq apply to each exposure within a sequence. They also apply to every sequence until the setup is reset with the two exceptions being VARIABLE_TIMED_MODE and BULB_MODE. These two modes ignore the exposure_time parameter in setup, and rely on a function or a trigger to determine the exposure time.
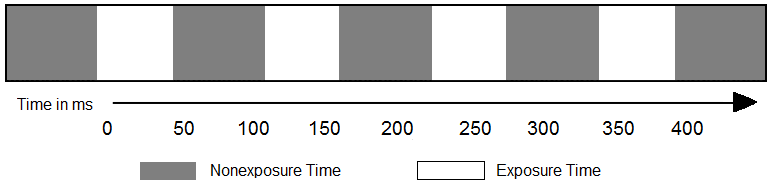
Every sequence has alternating periods of exposure and non-exposure time. During the time the sensor is not exposing, the camera could be in several states, such as waiting for pl_exp_start_seq, reading out, or performing clearing. In the diagrams that follow, each exposure mode shows the exposure time in white and the time between exposures in gray.
In TIMED_MODE, all settings are read from the setup parameters, making the duration of each exposure time constant and the interval times between exposures constant as well. In this mode, every sequence has the same settings.
The diagram below represents a sequence in TIMED_MODE.
Use TRIGGER_FIRST_MODE when an external trigger signal is used to start the the sequence.
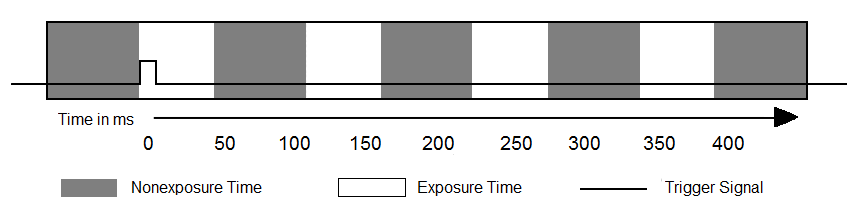
In TRIGGER_FIRST_MODE, pl_exp_start_seq starts the acquisition. The camera enters the clear mode while it waits for a trigger signal. The black line in the diagram illustrates a trigger signal coming from an external trigger source. If none of the CLEAR_PRE_EXPOSURE modes is used, the sensor will become trigger-ready immediately after pl_exp_start_seq is called.
Once an external event triggers the camera to start exposing, the acquisition follows an internal script generated in pl_exp_setup_seq. Note that all exposure times are equal, and the time intervals between exposures are equal, too.
An external trigger signal must be connected to the camera for TRIGGER_FIRST_MODE to function. If the equipment fails to send a trigger signal, the sequence can be stopped by calling pl_exp_abort.
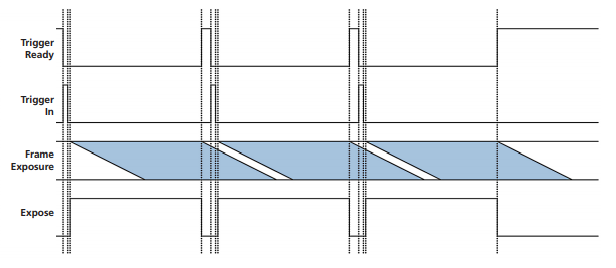
Use STROBED_MODE when an external trigger signal is used to start each exposure in the sequence.
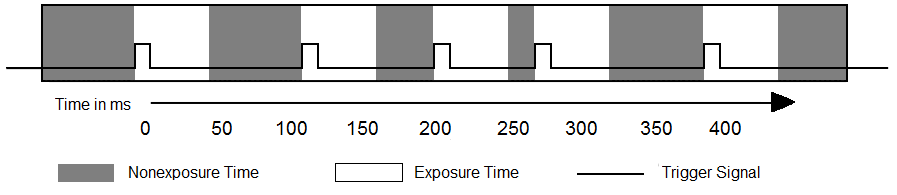
In STROBED_MODE, pl_exp_start_seq starts the acquisition. The camera enters clear mode while it waits for the first trigger signal to start the first exposure. As shown in the diagram above, each new exposure waits for an external trigger signal. Notice that the intervals between exposures can vary greatly, but the exposure times are constant. If none of the CLEAR_PRE_EXPOSURE modes is used, the sensor will become trigger-ready immediately after pl_exp_start_seq is called.
An external trigger signal must be connected to the camera for this mode to function. If the equipment fails to send a trigger signal, the acquisition can be stopped by calling pl_exp_abort.
Use BULB_MODE, when an external trigger signal is used to control the beginning and end of each exposure.
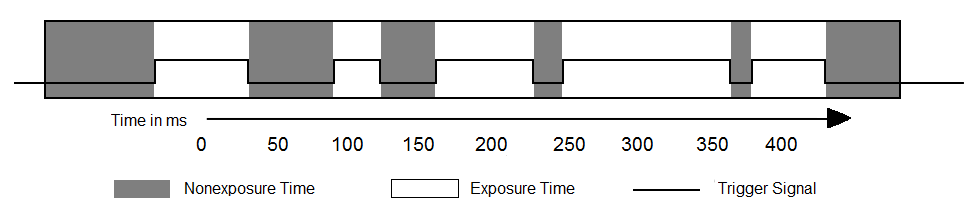
In BULB_MODE, pl_exp_start_seq starts the acquisition. The camera enters clear mode while it waits for a true external trigger signal to start each exposure. The sensor continues to expose until a false trigger signal ends the exposure. In the diagram above, the trigger signal line moves up to represent a true trigger and down to represent a false trigger. If none of the CLEAR_PRE_EXPOSURE modes is used, the sensor will become trigger-ready immediately after pl_exp_start_seq is called.
Notice that the exposure times and the intervals between exposures vary greatly. Since the true and false signals determine exposure time, the exposure_time set in pl_exp_setup_seq is ignored.
An external trigger signal must be connected to the camera for BULB_MODE to function. If the equipment fails to send a trigger signal, the sequence can be stopped by calling pl_exp_abort.
Use VARIABLE_TIMED_MODE when exposure_time needs to be changed between sequences.
In VARIABLE_TIMED_MODE, all the settings except exposure_time are read from the setup parameters. The exposure_time must be set with parameter ID PARAM_EXP_TIME. If PARAM_EXP_TIME is not called before the first sequence, a random time will be assigned. The camera will not read the first exposure time from the exposure_time in setup, because this mode ignores the exposure_time parameter.

The first sequence shows a case where exposure time of each acquisition is equal. In the second sequence, the exposure time varies between acquisitions.
Since PVCAM 3.0.1 the newly added Exposure Modes can be retrieved from the camera directly and cross-correlated with values in the PVCAM header files so that applications can narrow down which modes they would like to operate with. Application developers are encouraged not to hard-code the exposure modes in the source code but to read the supported modes from the camera dynamically. This change was introduced together with the addition of the Expose Out Modes.
Teledyne Photometrics cameras based on sCMOS sensors support multiple exposure (trigger) modes and several expose out behaviors. The available triggering modes and expose out behaviors can be discovered by reading the PARAM_EXPOSURE_MODE and PARAM_EXPOSE_OUT_MODE parameters. These cameras also support the "extended" trigger modes that need to be combined ("logically OR-ed") with the selected expose out mode.
Internal mode is the default triggering mode for sCMOS cameras. This means the software/application initiates the start of the acquisition. Once initiated, each frame captured in the sequence is controlled by the internal timing generators in the camera. Camera settings, expose out behavior and sequence size are set in the software application prior to acquiring the sequence. Internal trigger mode is used when synchronization with other devices is either not required or is controlled independently through the software.
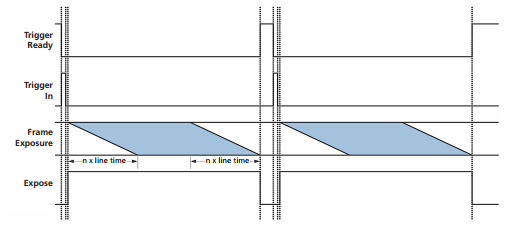
Similar to Internal Trigger Mode, but a hardware trigger from the I/O connector is required. Hardware triggering allows higher precision of acquisition timing than the software triggers. Rising edge of an external trigger initiates the start of a sequence of acquisitions. Once initiated, each frame capture in the sequence is controlled by the internal timing generators of the camera. Camera settings, expose out behavior and sequence size are set in the software application prior to acquiring the sequence.
Similarly to Trigger-First Mode, Edge Mode requires a hardware trigger, but in this case a trigger is needed for every frame. The rising edge of the external trigger initiates capture of a single frame. Each frame requires an external trigger from the I/O connector. Camera settings, expose out behavior and sequence size are set in the software application prior to acquiring the sequence.
This mode behaves identically to the legacy Bulb mode. See description in section Bulb Mode.
This mode combines the low trigger-to-exposure-start latency of external trigger modes with the simplicity of Internal trigger mode where a software command starts the exposure. Instead of physical trigger signal on the I/O connector, an API function pl_exp_trigger is used to signalize the acquisition start. At the same time, the latency between the API call and exposure start is significantly reduced compared to the Internal trigger mode. In Software Trigger Edge mode, the pl_exp_trigger function has to be called to start each exposure. Camera settings, expose out behavior and sequence size are set in the software application prior to acquiring the sequence.
This mode combines the low trigger-to-exposure-start latency of external trigger modes with the simplicity of Internal trigger mode where a software command starts the exposure. Instead of physical trigger signal on the I/O connector, an API function pl_exp_trigger is used to signalize the acquisition start. At the same time, the latency between the API call and exposure start is significantly reduced compared to the Internal trigger mode. In Software Trigger First mode, the pl_exp_trigger function has to be called once to start the first exposure with subsequent exposures being controlled by the camera internal trigger. Camera settings, expose out behavior and sequence size are set in the software application prior to acquiring the sequence.
Since PVCAM 3.0.1, the new enumerable parameter PARAM_EXPOSE_OUT_MODE can be retrieved dynamically from the currently connected camera and cross-correlated with the PVCAM header so that applications can decide which modes they prefer to operate in without user intervention. Please, refer to the Best Practice Example section below or to the Extended Enumerations code sample.
The settable Expose Out behaviors provide flexibility in different experimental scenarios.
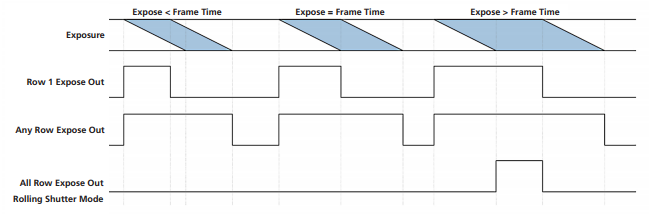
Edge triggering mode.The "Expose Out" I/O signal leaving the camera is high only when the first row of a single frame is being exposed. The length of the signal is equal to the exposure time for the first row. Exposure time is equal to the time set in the software application.
Although "First Row" behavior provides the maximum camera frame rates, it does not avoid the overlap due to rolling shutter. This mode is not recommended if trying to alternate between excitation wavelengths.
The "Expose Out" I/O signal leaving the camera is high when any row in a single frame is exposing. The length of the Expose Out signal is equal to the time between the start of the first row exposure and the end of the last row exposure. Each line exposes for the same amount of time which is equal to the value set in the software application. Maximum camera frame rates are not possible in this mode but this does avoid frame overlap.
The "Expose Out" I/O signal leaving the camera is high only when all rows within a single frame are exposing simultaneously. The length of the Expose Out signal is equal to the time between the start of the last row exposure and the end of the first row exposure, which is also equal to the exposure time set in the software application. Each row exposes for the duration as defined by the software application plus the time required for each row to start exposing.
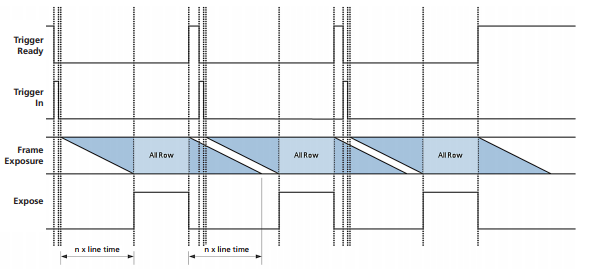
All Rows provides an effective global shutter with the speed and low noise benefits of rolling shutter, while eliminating rolling shutter motion artifacts. This mode is recommended for synchronizing the camera with high speed light sources that alternate excitation wavelengths for high speed multi-channel fluorescence and that only illuminate the sample when all rows are exposing.
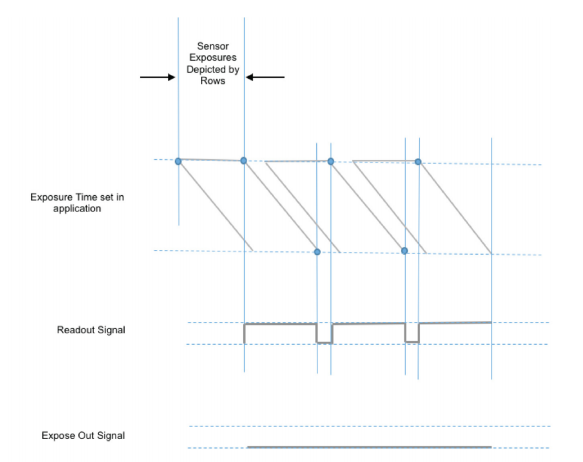
The Rolling Shutter Expose Out Mode is similar to the First Row Mode, except that the Expose Out signal is high only when all the rows are exposing.
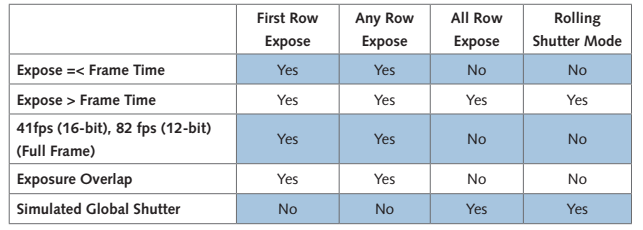
When Exposure time is shorter than readout time:
When Exposure time is longer than readout time:

Below is a comparison of the different Expose Out behaviors with different exposure durations:
From this comparison the following conditions can be defined for each expose out behavior:
In Programmable Line Trigger mode the camera sends a short pulse for every line readout. This allows accurate synchronization with external devices in Programmable Scan Mode.
The following example shows how to use the Extended Exposure Modes together with Expose Out Modes and still keep the backward compatibility with older cameras.
Define a helper function to retrieve available parameter values:
Setup the acquisition:
